Monthly Archives: July 2013

Setting up HackRF in Windows with SDR#

sdrbreaker


*** UPDATE ***

With the latest releases of SDR# and everyone getting their HackRF One’s from kickstarter, it appears this article is out of date.  I haven’t tested it but some chatter on the HackRF mailing list say that you should still grab the SDR# Nightly build, but there is no need to download the hackrf dll’s or editing the config file.  It should just work after that.  So it’s a little simpler now.

/*** UPDATE ***

I already got my HackRF working in linux with GNU Radio, but I dual boot my laptop into windows too and sometimes its nice to have access to other programs anyway.  Besides, I can’t seem to get it working inside a linux VM while in windows (Keep getting libusb IO errors, puuuh!).   So on with it.

USB Driver

zadig
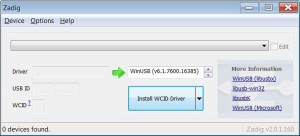
First thing we need is a driver.  Grab the latest Zadig, I’m using 2.0.1.160.  Un-7zip the file, run the installer and select your HackRF device to install the usb driver.


Application

Grab the latest _DEV_ version of SDR# here.  As of writing this I’m using 1135.

Unzip SDR# to your drive under your favorite naming convention (i.e.  c:\sdrsharp)


Plugin

Next grab a copy of the HackRF plugin from Zefie’s site.  Here is a link to v1.3 which is what I used.

Extract the HackRF plugin to your sdrsharp directory (i.e. c:\sdrsharp)

Open up SDRSharp.exe.Config and find the line “<frontendPlugins>”, and add

<add key="HackRF / USB" value="SDRSharp.HackRF.HackRFIO,SDRSharp.HackRF" />

sdrsharpeditpreferably directly after “<frontendPlugins>”

Save and close SDRSharp.exe.Config.


 Last few bits

hackrftools
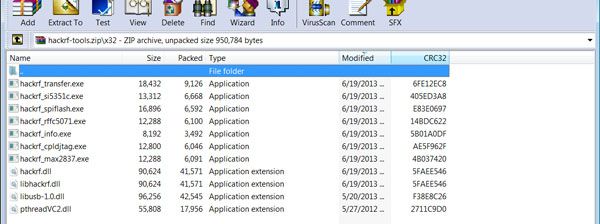
Grab a copy of hackrf-tools for windows here generously compiled by Zefie again.  Extract this somewhere, you might need this.  How about c:\sdrsharp\hackrf-tools.  Copy libhackrf.dll and pthreadVC2.dll from hackrf-tools 32 bit dir to the sdrsharp directory.

Finally you may need the Microsoft Visual C++ 2012 Redistributable package.  I didn’t because I already had it, but in case you don’t have it you can grab it here.

That should be all you need to get up and running.  I did notice some issues like my feed would stop every once in awhile, I just did a stop then start in SDR# and it got going again.  This is probably due to the fact everything is beta 🙂

Happy SDRing.

Fun with Le Strum

2013-07-03 22.00.18I picked up a Le Strum kit from tindie. The kit is made by Jason Hotchkiss.  He’s got some amazing kits.  I also picked up an Arpie, but i’ll get to that one when I have time.


2013-07-03 20.37.52


So what is Le Strum ?  It’s a midi controller that generates notes by strumming.  So what do you get in the kit ?  Well a PCB board, a ton of buttons, a few ic’s and passives… etc.  Everything needed to put the kit together.


2013-07-03 21.10.20

First thing to notice here, is there is a _lot_ of soldering to do.  All the resistors, diodes, and buttons oh my!  The instructions are pretty straight forward, hosted on github, no complications, put the resistors in, the diodes, caps, buttons, solder it all….  Assemble the strumming probe, power it on and rock out!


2013-07-03 22.00.06

Don’t forget to attach the legs in the correct order, I had the long and the short ones offset at first and it was odd… but that was quickly fixed.

So powering it on for the first time.  Everything looked like it could work — but I couldn’t get any audio out of it.  I was using a USB-to-MIDI adapter and trying to get some music into Fruity Loops Studio but I wasn’t getting any midi notes.

I started diagnosing the problem fearing i would have to disassemble the entire thing.  I grabbed an LED and shoved it into pins 4 and 5 in the midi port and verified there was some data being clocked out (despite there being a midi led on the board… I wasn’t sure if the led was wired to the actual traffic or just a gpio on the pic).  So I had data clocking out but my USB-to-MIDI adapter (which I’ve used in the past) just wasn’t happy.

So I ended up hooking the Le Strum up to my MIDI controlled YM2149 that is technically still in beta.  Surprisingly it worked fine with my board.  So it may be a cheap USB-to-MIDI adpater being picky about signal quality or clock skew.  Good thing the kit comes with the quick reference card it was a timesaver.  My YM board didn’t like the default setting of being on note-off but changing it to note-on and in 2 channel organ + strum mode it sounded awesome.  Here’s a video of me strumming some chiptunes!

2013-07-03 20.50.58So in closing, awesome kit.  My only concern is the incompatibility with my cheap usb to midi adapter.  Makes me wonder if other equipment will have the same issue.  My next issue is the longevity of the strum pads, I feel they are going to wear out pretty soon and I’m very temped to just blob them with solder to keep them from wearing out.  Here’s a closer up picture of the pads, they are just like large pcb pads — I guess we will have to see!